From a Wing to a Working System
The dissection is not the destination. Students need to see that muscle, bone, and skin are connected parts of a system; movement emerges from those relationships, and injury to one structure can disrupt the function of the whole limb.
In this chapter, you will see...
Do not let the dissection become the lesson. The dissection is evidence for how connected structures create function.
Lesson 2: From a Wing to a Working System
Lesson 2 is one of those lessons where I like the destination more than I like being locked into one route.
OpenSciEd wants students to figure out that skin, muscle, and bone are connected parts of a larger system; muscles pull on bones to create movement, and damage to one part can change the function of the whole limb. That is exactly the idea I want students to leave with.
The published lesson gets there through two chicken-wing video investigations: first an intact wing, then an injured one. Students map the wing to the human foot, develop structure/function language, compare normal and injured movement, and begin treating the body as a system of interacting subsystems.
My biggest change has been to replace the chicken wing with a frog hind leg. For a unit anchored in a human foot injury, the frog gives students a comparison that is almost immediately legible: thigh, lower leg, ankle area, foot.
The Time Problem Is Different Here
Unlike Lesson 1, OpenSciEd already plans Lesson 2 as two 45-minute periods. Two 66-minute blocks actually give me more clock time than the published 90-minute sequence. But extra minutes do not automatically justify preserving every routine.
A live dissection, student handling of specimens, cleanup, safety, and repeated observation take longer than watching a tightly edited video. If I add a mechanical model or injury-repair extension, that time disappears quickly.
Students should leave Lesson 2 understanding that skin, muscle, and bone are interacting parts of a system; muscles pull on connected structures to move bones, and when one part is damaged the function of the larger limb can change.
What OpenSciEd is trying to build
The Teacher Edition identifies two central pieces of work: students analyze the interactions among skin, muscle, and bone within a larger foot-or-wing system, then revise an investigation to predict and observe how injury changes function.
The published “What students will figure out” list is unusually clear: skin is attached to muscle, muscle is attached to bone, bones move when attached muscles move, and injury to one part can affect the whole system.
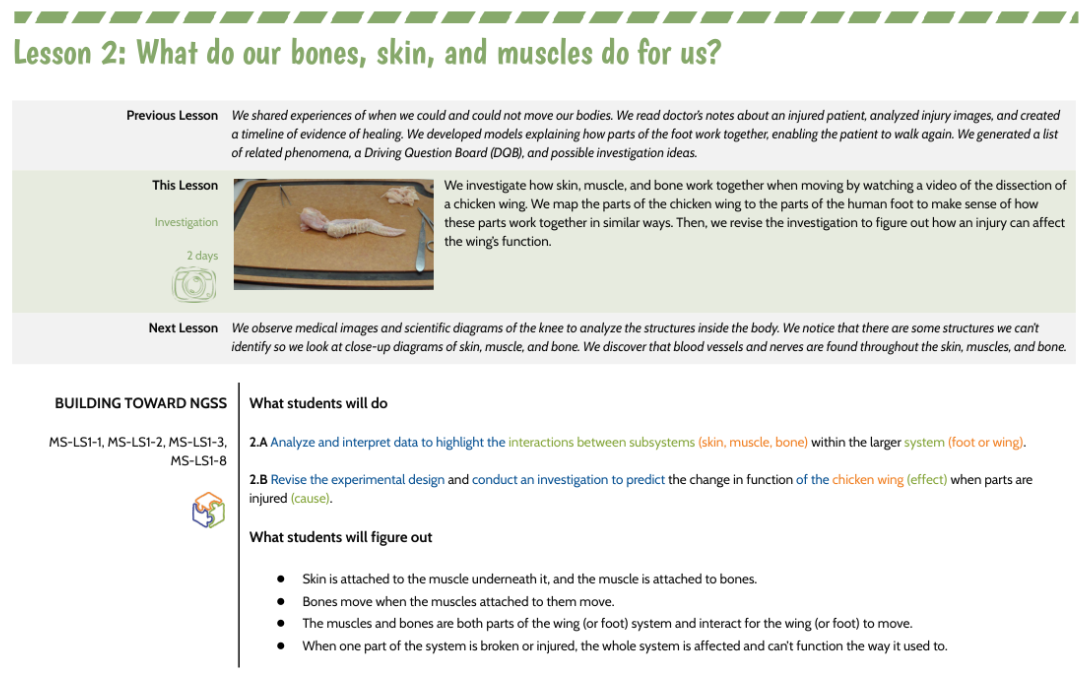
When I look at the original sequence, I see four jobs I do not want to lose: make the muscle-bone relationship visible, damage the system and observe the functional consequence, transfer the model back to the injured human foot, and establish structure/function and systems language.
1) Evidence that muscle action produces bone movement. 2) A before/after comparison of intact versus injured function. 3) A visual or written systems model students can reuse later. 4) A clear statement of what this model still cannot explain.
Modification #1: Use a frog leg because the analogy is easier to see
My primary modification is the specimen itself. Instead of a chicken wing, I use a frog hind leg.
I begin before the dissection by having students label the major external regions of the frog leg and place them beside a human leg. The visual similarities are useful enough that students can usually generate the mapping themselves: an upper leg, lower leg, ankle region, and foot.
Original model: chicken wing → human foot/limb.
My preferred model: frog hind leg → human leg/foot.
The scientific target stays the same; the analogy becomes more immediately visible.
Modification #2: Guide the dissection instead of hoping students notice the right thing
I have guided students through the frog-leg dissection with a document camera. I also recorded myself completing and narrating the dissection, which gives me a useful hybrid approach: play a section, pause it, model the same procedure live, let students work, then return to the video for a close-up or repeat view.
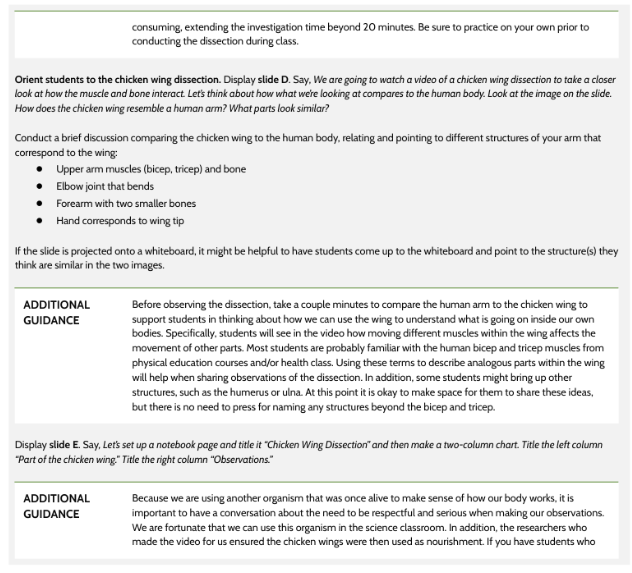
Modification #3: Make students feel the muscle-bone relationship in their own bodies
After exposing the relevant structures, we separate the calf enough that we can pull on the muscle and watch the frog's foot move downward. This is the moment I want everyone to see.
Then I connect it directly to their own bodies. Students can feel the calf tighten when they rise onto their toes, walk, or prepare to jump. The frog leg stops being an isolated specimen and becomes evidence for a mechanism they can feel happening in themselves.
The muscle pulls. Because it is connected to the bone, the bone moves. The movement of the bone changes the position of the foot. The function belongs to the system, not to one isolated part.
Modification #4: Break the bone, then repeat the exact same test
Once students have seen the intact system work, we deliberately break the shin bone of the frog leg. Then we pull on the calf again.
The muscle is still there. The foot is still there. The student can still apply a pull. But the relationship among the structures has changed, and the foot no longer moves properly.
What I am preserving from the injured-wing comparison
OpenSciEd's injured-wing sequence is conceptually strong. Students compare normal and abnormal motion, identify damage to bone and muscle, and then transfer those observations back to the injured human foot.
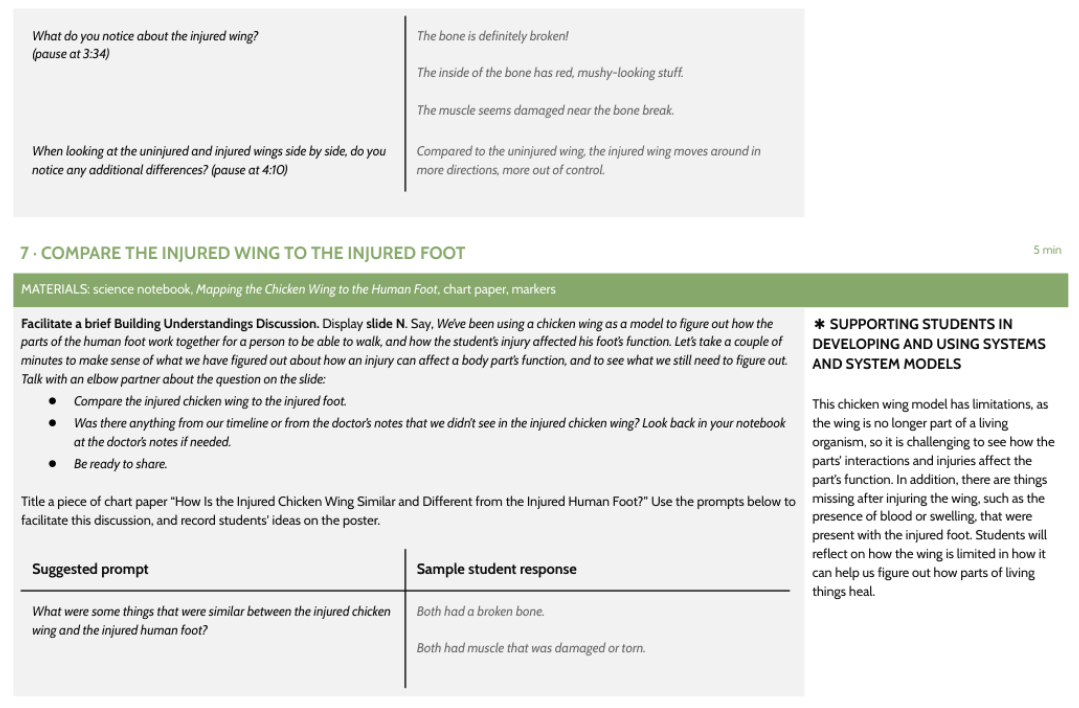
I keep that limitations discussion. The frog leg helps us see movement and failure, but it still cannot show us what happens over days and weeks inside a living body. That unresolved gap is useful because it keeps the unit moving.
Modification #5: Put the structure/function summary into one reusable visual
I usually finish with a graphic organizer showing the layers or structures of the foot. At minimum, students work with skin, muscle, and bone. I also include nerves and blood vessels as a visual preview of structures they will investigate next.
OpenSciEd intentionally limits Lesson 2 to skin, muscle, and bone. When I place nerves and blood vessels on the final organizer, I am using them as a visual bridge to Lesson 3 - not claiming students have already figured out their roles.
OpenSciEd vs. my rebuilt Lesson 2
| Element | OpenSciEd route | My current route |
|---|---|---|
| Comparative model | Chicken wing mapped to human foot/limb. | Frog hind leg mapped directly to human leg/foot. |
| First observation | Video of intact chicken-wing dissection. | Live/document-camera frog dissection supported by narrated video. |
| Movement mechanism | Pull wing muscles and observe bone movement. | Pull calf muscle and observe downward foot movement; feel the same calf action in our own bodies. |
| Injury | Watch deliberately injured chicken wing. | Break the frog shin, repeat the calf pull, and compare function before/after. |
| Structure/function | Develop class poster and Word Wall through discussion. | Consolidate with a layered foot organizer; allow deduction or use concise direct instruction. |
| Model limits | Compare wing with living injured foot. | Preserve the same limitations discussion: no true circulation, swelling, or healing. |
| This year | Biological specimen/video investigation. | Potential frog demonstration + mechanical muscle/bone kits + injury/stabilization/repair. |
The version I want to teach this year
This year I may not have enough frog legs for every group. I have enough for at least a strong teacher demonstration, and I still have my narrated dissection video.
Keep the frog leg as the biological anchor. If specimens are limited, demonstrate it well rather than forcing a weak group dissection. Then let students do more of the repeated manipulation and testing with the mechanical models.
This year's experiment: add a second model of the same system
The Carolina kits use wood pieces, rubber bands, masses, a spring scale, and a ring stand to model how muscles and bones work together. Students can change loads and positions and see how the arrangement of a joint affects the force required to lift.
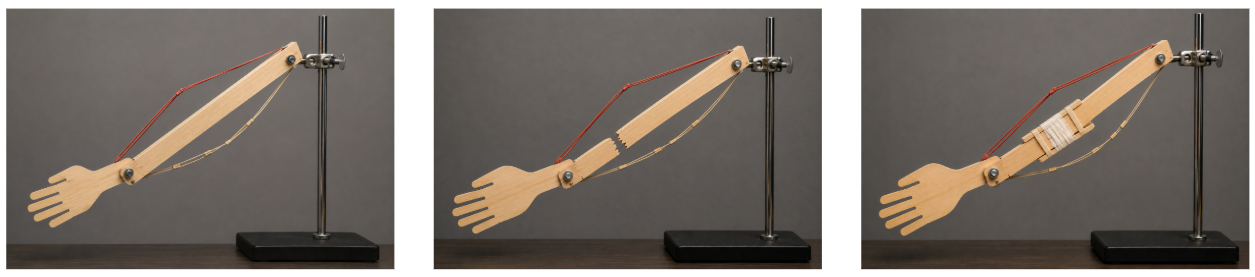
An experiment I want to try: break it, stabilize it, test it again
We appear to have an extra kit, which means I may be able to sacrifice one of the wooden “bones.” My idea is to establish a baseline lift, deliberately break the wood member, and then repeat the same task.
From there, I want to explore treatment. At the simplest level, we can compare a flexible bandage with a rigid splint. A wrap may hold materials together while still allowing substantial motion at the fracture. A splint should better stabilize the damaged structure.
The broken-board injury model, bandage-versus-splint comparison, and external-fixator demonstration are ideas I am testing in 2026-27. They are not yet proven parts of my lesson.
A better bridge to medical imagery
Once students ask how a doctor would stabilize or repair the damaged system, X-rays, plates, screws, pins, rods, and other orthopedic hardware stop being a collection of interesting medical pictures. They become solutions to a problem students have already modeled.
What I am protecting, compressing, and still questioning
The bigger point
I do not need students to use the same organism OpenSciEd chose in order to learn the intended science. I do need them to see a connected system, observe how force moves through it, disrupt the system, and explain the resulting change in function.
I do not need every class to build the structure/function poster exactly as written. I do need students to have a durable representation of what each structure does and how the parts interact.
And if the new mechanical models work, I may be able to add something the original lesson only hints at: a transition from injury to intervention. Break the system. Test it. Stabilize it. Test it again. Then ask what the body itself still has to do before the patient is truly healed.
Sources & design notes
Primary curriculum source. OpenSciEd. Unit 6.6, Lesson 2 Teacher Edition, “What do our bones, skin, and muscles do for us?” Version dated 2/9/22. Curriculum screenshots are reproduced for commentary, comparison, and instructional analysis.
Author's note. The frog-leg dissection, document-camera guidance, narrated video, fracture comparison, and layered foot organizer are established parts of my approach. The Carolina mechanical kits, intentionally broken wooden model, bandage-versus-splint comparison, external-fixator demonstration, and tighter integration with Lesson 3 remain active design experiments.
Return to top ↑Unit 6.6 • Injuries & Healing
Make the muscle-bone relationship visible, then show how injury to one structure changes the function of the whole limb.
movement mechanism • intact vs. injured comparison • transfer to human foot • systems thinking • model limitations
- START WITH ANALOGY
Label a frog hind leg and compare it with a human leg/foot. - GUIDE THE DISSECTION
Use the document camera and/or narrated dissection video. Pause so everyone sees the relevant structures and steps. - SHOW MOVEMENT
Pull the calf muscle and watch the foot move downward. Connect this with students feeling their own calf during walking, toe raises, or jumping. - MODEL INJURY
Break the frog shin bone. Repeat the calf pull and compare movement before vs. after injury. - MAKE THE SYSTEMS POINT
Muscle pulls → bone moves → limb functions. Damage the bone → the relationship is disrupted → function changes. - CONSOLIDATE
Use a layered foot organizer for skin, muscle, and bone. Optionally preview nerves and blood vessels. - IF FROGS ARE LIMITED
Use one strong teacher demonstration plus the narrated video rather than forcing every group to dissect. - THIS YEAR'S EXPERIMENT
Use Carolina muscle/bone kits to model force and joints; potentially add injury, bandage vs. splint, and stabilization/repair.
OpenSciEd already treats this as a two-day investigation. The extra time in two 66-minute periods is best spent on hands-on observation, repeated testing, cleanup, and a useful injury/repair extension.
Do not let the dissection become the lesson. The dissection is evidence. The lesson is about how connected structures create function - and what happens to the system when one structure fails.
Lesson 2: Practical Application Guide
What this lesson really needs to accomplish
Do not let the dissection become the lesson. The real purpose of Lesson 2 is for students to figure out:
Muscles pull on bones to create movement, and damage to one structure can change how the entire limb functions.
By the end of the lesson, students should understand that:
- Skin, muscle, and bone are physically connected.
- Muscles pull rather than push.
- Muscle action causes bones - and therefore limbs - to move.
- The structure of a body part helps determine its function.
- A limb functions because multiple structures interact.
- Damaging one part can affect the function of the larger system.
- A dissected animal limb can help us understand a human limb, but it has important limitations.
- The model still cannot explain blood flow, swelling, healing, nerves, or what happens inside living tissue over time.
What I have done in the past
1. Replace the chicken wing with a frog hind leg. The frog leg is more directly analogous to the human leg involved in the anchoring phenomenon.
We are not studying a frog because frogs are the topic. We are using the frog as a model to help us understand our own limbs.
2. Guide the dissection with a document camera and video. Video → pause → live model → students work → video again.
3. Make the muscle → bone → movement relationship unmistakable.
4. Injure the system and repeat the test
After students observe the intact limb functioning, we deliberately break the shin bone of the frog leg and repeat the same muscle pull. The muscle is still there. The foot is still there. But the relationship among the structures has been disrupted, and the foot no longer moves properly.
The muscle may still work, but the limb does not function normally because the relationship among the parts has been disrupted.
5. Explicitly connect the frog injury back to the human foot
Do not assume students will make the transfer automatically. Ask how the frog injury is similar to the injured foot from Lesson 1: broken bone, damaged muscle, loss of normal movement, and multiple structures affected by one injury.
Then ask what the frog leg cannot show us: circulation, active bleeding, swelling, nervous-system responses, immune responses, and healing over time. Those limitations create the need for the next investigation.
6. Finish with a layered foot systems organizer
| Structure | Basic function | Relationship |
|---|---|---|
| Skin | Covers/protects | Moves with structures underneath |
| Muscle | Produces movement | Pulls on connected bones |
| Bone | Support/shape/movement | Moves when muscles pull |
| Blood vessels | Preview only | Something we still need to investigate |
| Nerves | Preview only | Something we still need to investigate |
What I am considering this year
Add a mechanical muscle-and-bone model
This year I have Carolina Biological muscle-and-bone kits using wooden pieces, rubber bands, masses, spring scales, and ring stands. Students can manipulate the model to investigate how muscles pull, bones move, joint position affects force, and different loads change the required force.
Frog leg: biologically realistic. Mechanical model: easier to manipulate, measure, break, repair, and repeat.
What I am still trying to solve
Do all students need their own frog leg?
I may not have enough specimens for every group. I am not convinced that is necessarily a problem. A strong teacher demonstration using one frog leg, the document camera, and the prerecorded video may be enough to establish the biological mechanism.
An experiment I want to try: break the mechanical model
If I sacrifice an extra kit, students could establish normal function, measure the system, deliberately break one wooden “bone,” and repeat the same task. That would create a measurable version of what they observed biologically in the frog leg.
An even more interesting extension: treat the injury
A flexible wrap can represent a bandage. A rigid support can represent a splint. Students can compare what each treatment actually does to movement at the damaged structure.
A treatment does not necessarily cause healing. Sometimes it creates the conditions that allow healing to happen.
Possible teacher demonstration: external fixation
I am also considering building a larger demonstration model of an external fixator using simple hardware and scrap materials. The purpose would be to illustrate the engineering principle of keeping fractured structures aligned and stable while biological healing occurs.
Pair injury repair with medical images
Orthopedic images of pins, plates, screws, rods, or external fixation can become solutions to a problem students have already modeled rather than random medical pictures.
My current recommendation: give Lesson 2 two days
I would keep this as two 66-minute periods. The extra time should go into better observation, manipulation, and testing rather than stretching every discussion routine.
What to protect
- Seeing muscles produce movement.
- Comparing intact and injured function.
- Connecting the model back to the human foot.
- The system conclusion.
- The limitations of the model.
What to compress first
- Lengthy formal mapping activities.
- Extended compare-and-contrast writing.
- Repeated whole-class share-outs.
- Long vocabulary-development discussions.
- Building the full class poster from scratch.
- Formal Progress Tracker setup if another note structure exists.
What I am still testing
- Whether every group truly needs a frog leg.
- How much conceptual value the mechanical kits add.
- Whether breaking a wooden model creates a clear enough functional difference.
- Whether bandage versus splint is a worthwhile comparison.
- Whether an external-fixator model clarifies orthopedic repair or becomes a distraction.
- How tightly to connect this lesson to the medical-imaging work that follows.
Do not let the dissection become the lesson. The dissection is evidence. The lesson is about how connected structures create function - and what happens to the system when one structure fails.