Learning to See Inside the Body
Rethinking a seemingly short medical-imaging lesson by reducing visual overload, simplifying student production, and protecting the reasoning chain that reveals blood vessels and nerves throughout the body.
THE BIG IDEA
The chapter is less about teaching medical technology than teaching students how to interpret representations: different images reveal different information, and one representation can help us make sense of another.
In this chapter, you will see...
THE CHAPTER TAKEAWAY
Sometimes rebuilding the lesson means adding something. Sometimes it means finally having the confidence to take something away.
Lesson 3: Learning to See Inside the Body
Why one of the shortest lessons in the Teacher Edition routinely takes me a full period - and why my next modification may be to stop asking students to do so much with every image.
Lesson 3 looks harmless on paper.
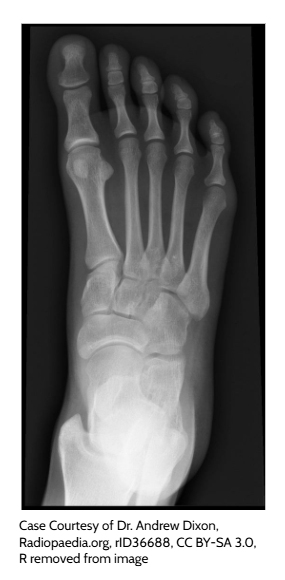
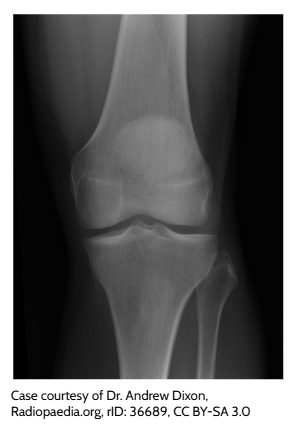
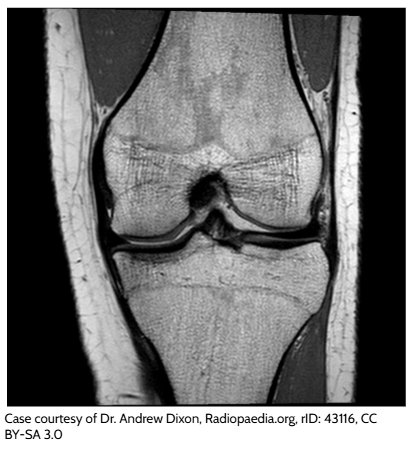
OpenSciEd lists it as a one-day investigation. The formal learning plan adds up to only about forty-two minutes: compare X-rays and MRIs, talk about cross sections, interpret knee images with scientific diagrams, zoom in on skin, muscle, and bone, notice a pattern, and navigate toward blood and nerves.
I have taught it pretty faithfully.
It has also taken me seventy-eight minutes. At least.
That mismatch is worth paying attention to because the problem is not that the lesson is badly designed. The problem is that visual interpretation is slower than it looks in a teacher guide. Students have to orient themselves to unfamiliar images, decide what counts as evidence, compare representations that do not look alike, annotate, talk, revise, and then repeat the process at a new scale. Add materials, color copies, transitions, questions, and the inevitable student story about the time somebody broke an arm, and a forty-two-minute plan can become a full block without trying very hard.
This lesson is not really about medical imaging. It is about teaching students how to see.
The Time Problem Is Hidden in the Images
Lesson 3 is different from Lesson 1's obvious pacing problem. OpenSciEd is not asking for four days here. The official sequence is compact. But nearly every step asks students to perform a high-load visual-literacy task: compare an X-ray with an MRI, mentally rotate cross sections, map a realistic medical image onto a simplified color diagram, zoom to another representation, and identify patterns across skin, muscle, and bone.
Those tasks are quick for an adult who already knows what a knee is supposed to look like from the inside. They are not necessarily quick for a seventh grader seeing an axial MRI for the first time.
So my current question is not simply how to move faster. It is whether students need to do every comparison, annotation, and discussion themselves in order to preserve the reasoning chain.
THE NON-NEGOTIABLE OUTCOME
Students should leave Lesson 3 knowing that X-rays and MRIs reveal different information, that scientific diagrams can help us interpret complex medical images, and - most importantly - that blood vessels and nerves are found throughout skin, muscle, and bone. They do not yet need to explain what blood or nerves do.
What OpenSciEd is trying to build
The official lesson has an elegant progression. Students begin with medical images that provide authentic evidence but are difficult to interpret. They then use scientific diagrams as a second source of information. Finally, they zoom in on diagrams of skin, muscle, and bone and look for repeated structures.
The central discovery is deliberately modest: blood vessels and nerves appear throughout all three structures. Their functions remain unresolved so that the next lessons have a reason to exist. OpenSciEd is explicit that this is not yet a cell lesson and not yet an explanation of healing.
When I strip the lesson down to its intellectual architecture, I see one reasoning chain worth protecting:
Medical image → scientific diagram → close-up diagram → pattern across structures.
PROTECTED ARTIFACTS
1) A comparison showing that different imaging tools reveal different information. 2) One annotated representation of a knee or leg. 3) Evidence that blood vessels and nerves occur in skin, muscle, and bone. 4) A question about what blood or nerves might be doing there.
What I have done: mostly follow the lesson as written
Unlike Lesson 1 and Lesson 2, I do not have a dramatic replacement for the core OpenSciEd activity. I have generally followed the published sequence because the sequence itself makes sense.
Students compare X-rays and MRIs. They notice that X-rays make bones easy to see while MRIs reveal many more structures but are harder to interpret. We discuss cross sections. Students compare knee MRIs with color-coded scientific diagrams. Then they look at close-up diagrams of skin, muscle, and bone and use those diagrams to identify additional structures.
I do not object to any one of those moves. The accumulation is the issue. Each step contains just enough annotation and discussion to feel small. Together, they can make the lesson feel like students are constantly being asked to stop, write, compare, turn, talk, label, and restart.
Modification #1: Pair the lesson with a richer medical-imaging text
I have also paired the OpenSciEd materials with a short medical-imaging text from another textbook. I like it because it expands the visual world of the lesson beyond X-rays and MRIs. Students encounter CT scans, ultrasound, endoscopy, laparoscopy, and examples of orthopedic hardware.
The text also gives the images a clinical reason to exist. A family in a car accident receives different imaging tests for different injuries: an X-ray for a fracture, an MRI for a ligament injury, and a CT scan for a possible brain injury. That makes the basic point more concrete: medical imaging is not one magical camera. Different tools are useful for different questions.
Open the original Cells and Systems student reader from Core Knowledge. The medical-imaging section introduces X-rays, MRI, CT, ultrasound, and other tools through an injury scenario.
Open the Core Knowledge Reader PDF →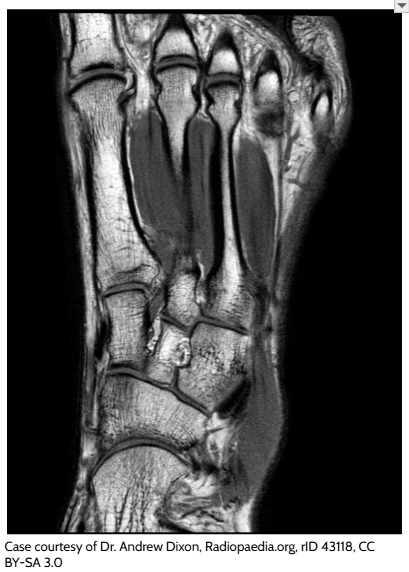
The text can do more than add content
This year, I am thinking about using that text less as 'extra reading' and more as a deliberate reading-strategy lesson.
The pages are already highly visual, which makes them a good place to practice a routine students can use throughout the year. One option is a simple See-Think-Wonder adapted for technical text. Another is a Reciprocal Teaching four-square: predict, question, clarify, summarize.
That would let the medical-imaging content pull double duty. Students learn something useful about imaging technologies while also practicing how to attack a dense informational page.
THE SHIFT
Old use of the text: additional information after the lesson. Possible new use: one visual-rich reading task that teaches students how to extract meaning from technical text and images.
Modification #2: I tried stations - and made each station too expensive
At one point I turned the lesson into a stations activity. I printed large versions of the medical images and placed different questions and directions at each station.
I still like the basic idea. Medical images are naturally gallery-like. They invite students to get close, point, compare, and talk.
What I did not like was what I asked students to produce. Each station accumulated tasks: answer questions, color something, annotate something, explain something. Instead of each image becoming a quick piece of evidence, every station became its own mini-assignment.
The structure looked active. Cognitively, it was heavy.
A station should create a new observation, not a new packet.
What I would change about the stations now
If I return to stations, I would make the student task almost embarrassingly simple.
One image. One observation. One interpretation. One question.
A BETTER STATION PROMPT
SEE: What can you identify? THINK: What does this image seem especially good at showing? WONDER: What can you not explain from this image alone?
Students could rotate through an X-ray, MRI, CT, ultrasound, orthopedic-hardware image, and perhaps a student- or teacher-provided medical artifact. Their job would be to collect evidence, not complete six separate worksheets.
That version preserves movement and visual curiosity without allowing the logistics of the station activity to consume the lesson.
Modification #3: Treat diagrams as translators
The strongest part of the original OpenSciEd lesson may be the move from realistic MRI images to simplified scientific diagrams. It quietly teaches something important about scientific representations.
A medical image can be authentic and still be hard to understand. A diagram can be less realistic and more useful.
OpenSciEd has students place the MRI beside color-coded cross-sectional diagrams, label what they can identify, and put question marks beside structures they still cannot explain. The diagram is functioning as a translator between raw evidence and student understanding.
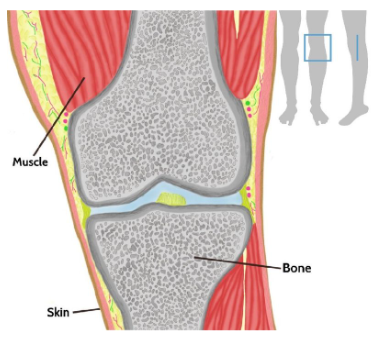
More realistic does not automatically mean more informative.
Modification #4: Make one model - but decide what the drawing is actually for
I often pair this lesson with a modeling activity. Students draw a vertical cross section of the knee or leg, use color strategically, and label skin, muscle, bone, blood vessels, and nerves. Sometimes they add captions explaining what the structures are or how they relate.
I like parts of this activity. Turning a medical image into a student-created representation is useful practice. Students have to decide what to include, where structures belong, and how color can communicate information.
But I am less convinced that the act of drawing every shape is always worth the time.
If the instructional target is spatial organization, the drawing earns its time. If the target is simply 'blood vessels and nerves are throughout these tissues,' then a partially completed diagram that students label, color strategically, and annotate may get me to the same destination faster.
THE QUESTION I AM ASKING
Does drawing the entire knee make students reason about the system - or does it mostly make them practice drawing? If labeling and captioning carry the thinking, I can scaffold the artwork without feeling guilty.
The close-up diagrams are the real discovery
The lesson's endpoint does not actually depend on becoming good at MRI interpretation. The MRI creates the need for another source. The close-up diagrams provide the pattern students need.
Students compare skin, muscle, and bone and notice that blood vessels and nerves appear in all three. Other structures vary: fat may be associated with skin, tendons with muscle, cartilage at the ends of bones. Blood vessels and nerves are the repeated pattern.
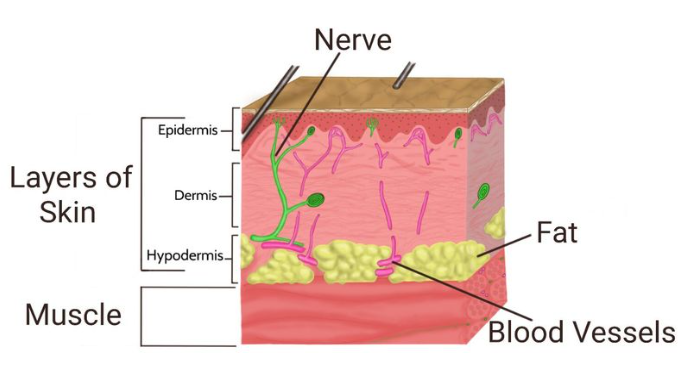
Modification #5: Use real medical artifacts when they walk through the door
This lesson has also become one of my favorite places to use authentic medical artifacts.
I have a framed image of my own broken elbow. In another year, a student brought in a collection of images and videos from a relative's much more serious injuries: a shattered knee, facial fractures, and unusual three-dimensional medical imaging. Those materials immediately changed the room.
There is something different about looking at a generic scan in a curriculum and looking at an image that belongs to somebody in the classroom's orbit. Students ask better questions because the image has a story attached to it.
I would never require students to share private medical information, and anything brought in has to be appropriate for the room. But as an optional contribution, real artifacts can turn this lesson into a small class museum of how doctors look inside bodies.
POSSIBLE CLASSROOM MOVE
Invite optional, de-identified medical images or stories from families: X-rays, casts, braces, MRIs, ultrasound images, orthopedic hardware images, or photos of healed injuries. Use them as evidence and conversation starters, not as a requirement.
This year: maybe the biggest modification is where the lesson goes
The most consequential idea I am considering is not changing the activity at all. It is changing the sequence.
Lesson 3 may be a good candidate to shrink into roughly half of a 66-minute period and place immediately after the anchoring work from Lesson 1. That would let me spend about a day and a half on Lesson 1, then use the second half of Day 2 for medical imagery.
The advantage is background knowledge.
Students would enter the frog-leg dissection and mechanical-model work already knowing the basic visual geography of a limb: skin outside, muscle around bone, blood vessels and nerves threaded through the structures. That may make Lesson 2 easier to interpret because students are no longer encountering every structure for the first time while also learning a dissection procedure.
This would be a real departure from the published order. I have not tested it yet. But it fits the larger shift in my teaching: sometimes a small amount of strategically placed information makes the later inquiry richer rather than weaker.
OpenSciEd vs. my rebuilt Lesson 3
| ELEMENT | OPENSCIED ROUTE | MY CURRENT / POSSIBLE ROUTE |
|---|---|---|
| Time | One day; ~42 minutes of planned activities | Historically ~78 minutes; considering a 30–35 minute compressed version |
| Medical images | Compare X-rays and MRIs of foot, knee, and hand | May focus on fewer anchor images; supplemental imaging text adds CT, ultrasound, and other technologies |
| Student response | Repeated annotation, partner talk, and whole-class discussion | Reduce repetitive production; use one strong response routine |
| Cross sections | Recall prior OSE experiences; optional apple demonstration | Teach quickly with gesture/analogy unless students genuinely need more support |
| MRI interpretation | Match knee MRIs to color diagrams | Protect this step; it teaches diagrams as interpretive tools |
| Close-up diagrams | Identify repeated structures across skin, muscle, bone | Protect - this is the core evidence for blood vessels and nerves |
| Modeling | Annotate OSE references | Often add a vertical cross-section model; considering more scaffolded labeling instead of full drawing |
| Stations | Not part of published lesson | Tried before; if revived, simplify to one See-Think-Wonder rather than multi-question tasks |
| Artifacts | Curriculum images | Optional teacher/student medical artifacts can broaden authenticity |
| Sequence | After Lesson 2 | Considering half-day after Lesson 1, before Lesson 2 |
What I am protecting, compressing, and still questioning
The version I want to try this year
I see two viable versions, depending on where Lesson 3 sits in the sequence.
OPTION A - KEEP THE PUBLISHED ORDER
Teach Lesson 2 first. Then give Lesson 3 one 66-minute period, but streamline the number of images and response cycles. Use the medical-imaging text as the main reading-strategy practice and preserve the MRI → diagram → close-up pattern.
OPTION B - THE EXPERIMENT
Give Lesson 1 about a day and a half, then use the remaining half-period for a condensed Lesson 3. Students enter Lesson 2 already knowing where skin, muscle, bone, blood vessels, and nerves are located. The dissection then becomes an investigation of how those known structures function together.
A possible half-day Lesson 3
| TIME | MOVE | PURPOSE |
|---|---|---|
| 5 min | X-ray vs. MRI | What can each reveal? |
| 5 min | Cross-section mini-lesson | Understand that MRI images can be slices/views through the body. |
| 8 min | Knee MRI + color diagram | Use the scientific diagram as a translator. |
| 8 min | Close-up skin/muscle/bone diagrams | Find repeated structures. |
| 6 min | Label one knee/leg cross section | Record skin, muscle, bone, blood vessels, nerves. |
| 3 min | Exit/navigation | Why are blood vessels and nerves everywhere? What do they do? |
The supplemental text can be assigned before, after, or as a separate literacy routine rather than trying to make it another full activity inside the same half-period.
The bigger point
This lesson has taught me something useful about modification: adding engagement does not always mean adding learning.
My stations were more active than the original lesson, but I also made every stop expensive. A full student drawing can be creative, but it may not add more reasoning than a strategically labeled diagram. A second text can enrich the lesson, or it can become one more thing students have to finish.
The curriculum's original reasoning chain is actually good. My job may be less about redesigning it than removing the friction around it.
I want students to compare representations, recognize the limits of each one, and use one source to interpret another. I want them to discover a pattern rather than be handed a fact. I want them to leave with a more complete picture of what is inside the injured foot - and a new reason to ask what blood and nerves are doing there.
Sometimes rebuilding the lesson means adding something. Sometimes it means finally having the confidence to take something away.Sources & design notes
Primary curriculum source
OpenSciEd. Unit 6.6, Lesson 3 Teacher Edition, “How can medical images and diagrams help us figure out more about the structures in our body?” Version dated 2/9/22. Curriculum screenshots are excerpted from the user-provided Teacher Edition for commentary, comparison, and instructional analysis.
The published lesson is a one-day image-analysis sequence in which students compare X-rays and MRIs, interpret cross-sectional knee images with scientific diagrams, examine close-up diagrams of skin, muscle, and bone, and identify the pattern that blood vessels and nerves occur throughout those structures.
Supplemental source
Medical Images Text. The supplemental four-page reading includes an injury scenario and short explanations of X-ray, MRI, CT, ultrasound, endoscopy, laparoscopy, and orthopedic hardware. In this chapter I treat it as an optional literacy and visual-analysis resource rather than part of the OpenSciEd lesson.
Retrieved from: https://www.coreknowledge.org/wp-content/uploads/2022/11/CKSci_G6U6_Cells-and-Systems_SR_Web.pdf
Author's note
Established practice: largely following the OpenSciEd image sequence, pairing the lesson with the supplemental medical-imaging text, adding a labeled cross-sectional model, and occasionally incorporating authentic medical artifacts. Active experiments for 2026-27: a simplified station format, using the text for a formal reading strategy, compressing the lesson to roughly half a period, and possibly teaching Lesson 3 before Lesson 2.
Return to top ↑LESSON 3 | CONDENSED MODIFICATION GUIDE
Unit 6.6 • Injuries & Healing
PROTECT: X-ray vs. MRI • cross sections • diagram as translator • close-up pattern • blood vessels + nerves • unresolved functions
- Compare ImagesUse one strong X-ray/MRI comparison. Students identify what each image reveals and what remains unclear.
- Explain Cross SectionsKeep it quick: a cross section is a slice/view through an object that lets us see inside.
- Use The DiagramCompare a knee MRI with a color-coded scientific diagram. Label skin, muscle, and bone; mark unknowns with ?.
- Zoom InUse close-up skin, muscle, and bone diagrams. Look for structures that repeat across all three.
- Find The PatternStudents should identify blood vessels and nerves throughout skin, muscle, and bone.
- Record One ModelLabel or annotate one knee/leg cross section. Full drawing is optional; the labels and relationships matter more.
- Reading OptionUse the supplemental medical-imaging text for See-Think-Wonder or Reciprocal Teaching rather than as extra busywork.
- Artifact OptionInvite optional de-identified X-rays/scans/hardware images from teacher or students to create a mini medical-image gallery.
RECOMMENDED TIMING
CUT FIRST: all three body regions • long cross-section setup • machine physics • MRI-plane vocabulary • repeated share-outs • full drawing from scratch.
ONE RULE FOR A NEW TEACHER
Do not ask students to master medical imaging. Use the images to teach a more transferable skill: different representations reveal different information, and combining them can expose a pattern we could not see from the outside.
Adapted from OpenSciEd Unit 6.6, Lesson 3 • Teacher-use summary
Return to top ↑Lesson 3: Practical Modification Guide
Medical Images, Cross Sections & Looking Inside the Body
What this lesson really needs to accomplish
Do not get buried in the number of images. The purpose of Lesson 3 is to help students use multiple representations to figure out what is located inside skin, muscle, and bone.
TARGET
Students should figure out that blood vessels and nerves are found throughout skin, muscle, and bone. They do NOT yet need to explain what blood vessels or nerves do.
X-rays are especially useful for seeing bones.
MRIs reveal more soft-tissue detail but are harder for novices to interpret.
Cross-sectional views let us see inside a structure from different perspectives.
Scientific diagrams can help interpret realistic medical images.
Blood vessels and nerves appear throughout skin, muscle, and bone.
The functions of blood and nerves remain an open question.
What I have done in the past
1. Follow the OpenSciEd reasoning sequence
I have generally kept the original progression because it works: X-ray vs. MRI → cross section → knee MRI + diagram → close-up diagrams → blood vessels/nerves pattern.
2. Add a medical-imaging text
I pair the lesson with a visual textbook reading on X-rays, MRI, CT, ultrasound, endoscopy, and other imaging. This year I would use it deliberately for a reading strategy such as See-Think-Wonder or Reciprocal Teaching.
3. Use a cross-sectional knee/leg model
Students often create or annotate a vertical cross section showing skin, muscle, bone, blood vessels, and nerves. If time is limited, give them a scaffolded diagram and make the labeling/captioning the intellectual work.
4. Use authentic medical artifacts
Optional teacher/student X-rays, scans, braces, hardware images, or injury stories can make the lesson feel real. Keep participation voluntary and use de-identified/appropriate materials.
What did not work as well
Stations with too many jobs
I have used large medical images as stations, but I overloaded each station with questions, coloring, annotation, and written responses. If I return to stations, I would simplify each stop to:
ONE STATION = THREE MOVES
SEE one important feature. THINK what the image seems good at showing. WONDER what you still cannot tell.
What I am considering this year
1. Shrink Lesson 3 to half a period
This is a strong candidate for a 30–35 minute version because the core reasoning chain is compact once repetitive discussion is removed.
2. Move it before Lesson 2
Possible sequence: Lesson 1 for 1.5 days → condensed Lesson 3 for 0.5 day → Lesson 2 frog dissection/mechanical models. This would front-load just enough visual anatomy to help students interpret the later hands-on investigation.
3. Separate literacy from image-analysis overload
The supplemental medical text can become its own reading-strategy practice rather than another assignment stacked onto the OpenSciEd sequence.
My current recommendation
If keeping the published order, use one 66-minute class and cut repetition. If you are comfortable experimenting with sequence, try the half-day version after Lesson 1 and before Lesson 2. Either way, protect the same reasoning chain:
X-ray/MRI → cross section → diagram → close-up → blood vessels + nerves.
What to cut first
Comparing foot, knee, and hand if one strong knee comparison will do.
Lengthy personal-experience share-outs.
References to earlier Earth-science cross sections unless students need them.
The apple demonstration if a quick visual/gesture works.
Technical vocabulary such as axial, coronal, transverse, and sagittal.
Detailed explanations of how the machines work.
Repeated turn-and-talk / whole-class share cycles.
Drawing every structure from scratch if labeling captures the reasoning.
What not to cut
At least one X-ray vs. MRI comparison.
The idea of a cross-sectional view.
MRI-to-scientific-diagram comparison.
Close-up diagrams of skin, muscle, and bone.
The pattern: blood vessels and nerves occur in all three.
A connection back to the injured foot.
Leaving the functions of blood and nerves unresolved.
Medical images and scientific diagrams used on this page are from OpenSciEd Middle School Unit 6.6, Cells & Systems, Lesson 3, “How can medical images and diagrams help us figure out more about the structures in our body?”, by OpenSciEd, licensed under Creative Commons Attribution 4.0 International (CC BY 4.0). Images have been cropped and presented with new captions for commentary and instructional analysis. OpenSciEd does not endorse PIRL Experimental or these modifications.