Start With the Mystery
The lesson has to establish the injury, the evidence of recovery, and the unanswered mechanism. Students do not need to know how healing works yet; they need a reason to want to find out.
In this chapter, you will see...
Preserve the mystery, the evidence, and the unanswered questions. Everything else is negotiable.
Lesson 1: Start With the Mystery
The first lesson of a unit has an impossible job. It has to be interesting before students know enough to understand why it is interesting. It has to surface what they already think without letting their misconceptions harden into facts. It has to build vocabulary without becoming a vocabulary lesson. It has to generate questions that will still matter three weeks later. And, in September, it has to do all of that while students are still figuring out where the pencils are.
OpenSciEd’s first lesson in Unit 6.6 is a four-day anchoring phenomenon. Students move from personal experiences, to a middle-school foot injury, to emergency-room and post-surgical reports, to recovery evidence, a healing timeline, individual and consensus models, related phenomena, a Driving Question Board, and ideas for future investigation.
The anchor is good. The mystery is good. The medical evidence is good. The questions are good. But the experience can become too wordy, too procedural, and too slow before students have enough background knowledge to distinguish the important clues from the noise.
The Time Problem Is Bigger Than the Math
OpenSciEd designs this lesson for four 45-minute periods—about 180 minutes of instructional time. Under my current schedule, I can realistically give it no more than two 66-minute periods, or 132 minutes. The missing 48 minutes matters, but the larger problem is that the structure of that time is different.
Four shorter periods give students four separate chances to enter the phenomenon, stop, process, return, revisit prior thinking, and gradually build the storyline across several days. Two longer periods create fewer transitions but demand much more sustained attention and force more instructional moves to happen in a single sitting.
Students should leave Lesson 1 knowing that several structures in the foot were damaged, that those structures changed over time, that function eventually returned, and—most importantly—that we still do not know what happened inside the body to make that recovery possible.
What OpenSciEd is trying to build
OpenSciEd Lesson 1 is designed to launch a four-day anchoring phenomenon by centering three core pieces of student work:
- Obtain information from images and doctors’ notes.
- Develop an initial model of healing across interacting systems and subsystems.
- Ask questions that arise from the injury.
Students are not supposed to explain the microscopic mechanism yet. The first lesson should create the need to learn more, not resolve the case.
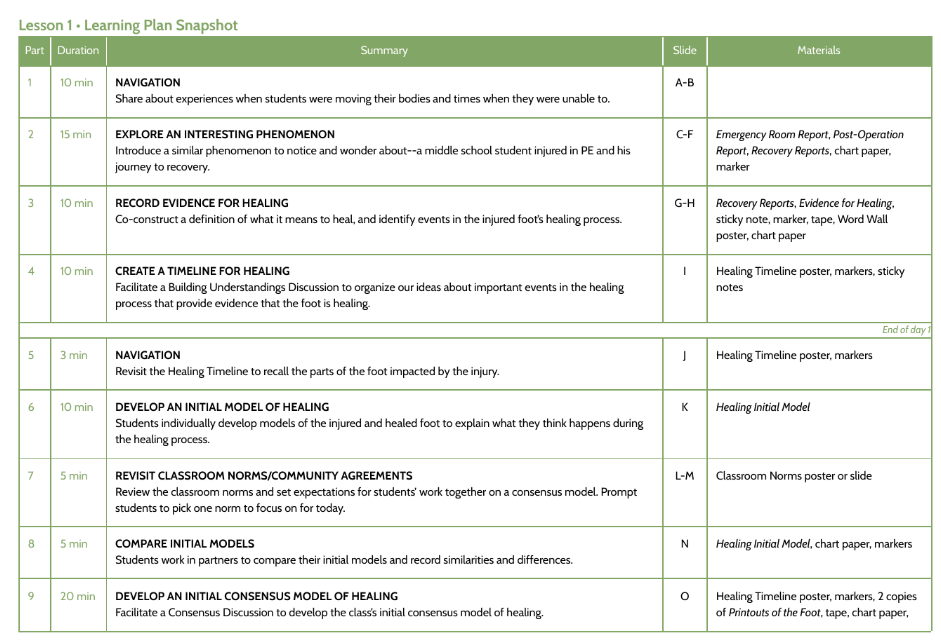
When you strip away the choreography, what remains is not sixteen sacred activities but a handful of essential jobs: hook students into the case, identify damaged structures, establish evidence of healing over time, expose initial explanations, and capture usable questions.
1) A clear visual record of the injury and recovery. 2) An initial explanation/model of what changed. 3) A usable set of student questions.
Modification #1: Let students see the case before they read the case
The first encounter should be overwhelmingly visual. Students see the injured-foot photos, X-rays, the cast, crutches, and recovery images before they decode any reports.
What do you literally see? What do you think happened? What evidence makes you think that? What do you predict happened next? What questions does the image create?
This gives every student an entry point and primes them to read with a purpose: confirm, revise, or reject their predictions.
Original sequence: read → notice → wonder.
My preferred sequence: see → predict → read → confirm/revise → wonder again.
Modification #2: Turn the medical reports into a guided reading lesson
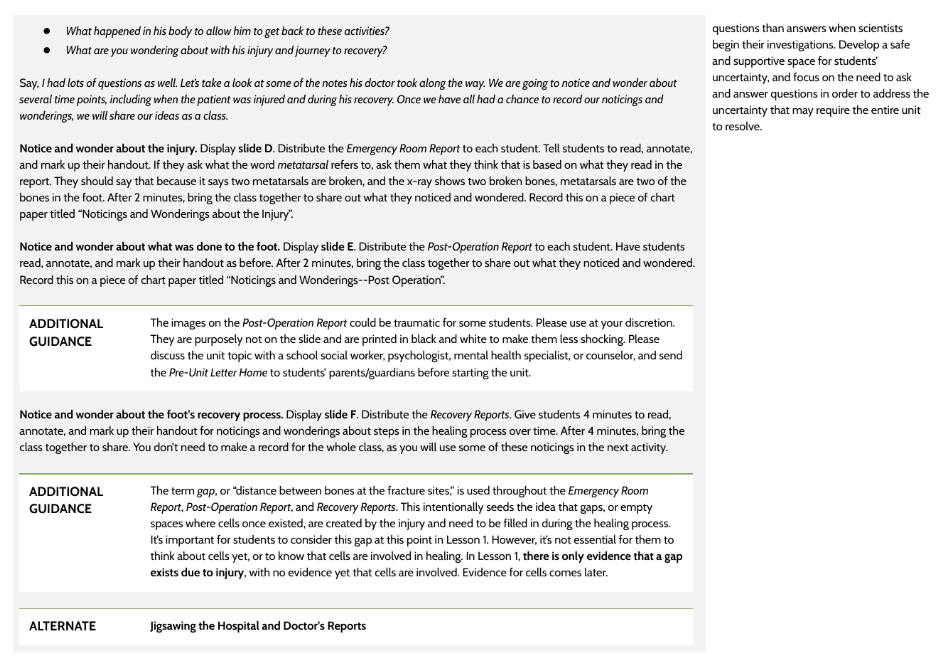
Use the ER and Post-Operation reports as authentic artifacts, but teach them as a guided reading lesson—not a free-for-all worksheet.
Provide students with a simple symbol key to annotate each line or finding as they read:
Discuss the evidence as a class. Use disagreements diagnostically: if students do not agree on a symbol, the line needs more investigation, not a teacher answer.
The unresolved question: do I really need two separate opening reports?
I am still experimenting with the Emergency Room and Post-Operation reports. I want students to possess the information, but I am not convinced that both documents deserve separate full-class treatment under a 66-minute A/B schedule.
My current instinct is to combine them into one concise injury-and-intervention packet: what was damaged, what doctors could observe, what was done immediately, and what evidence students should carry forward.
Modification #3: Give them the timeline. Make them explain it.
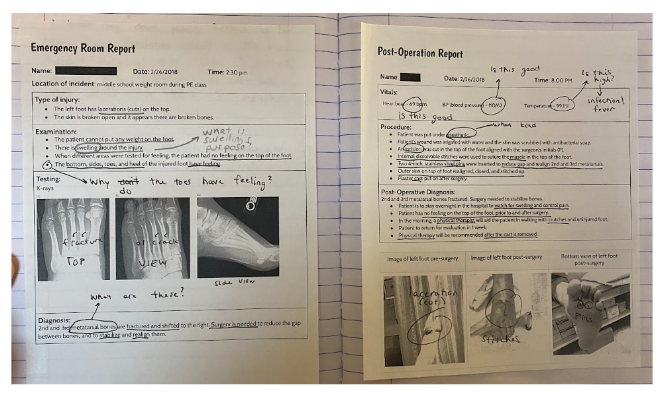
The original lesson has students build a healing timeline from scratch. In the redesign, I provide a pre-completed chronological structure while students explain why each event counts as evidence of healing—why stitches being removed, reduced swelling, the fracture becoming harder to see, and increasing range of motion all matter.
Modification #4: Put the systems thinking directly on the foot
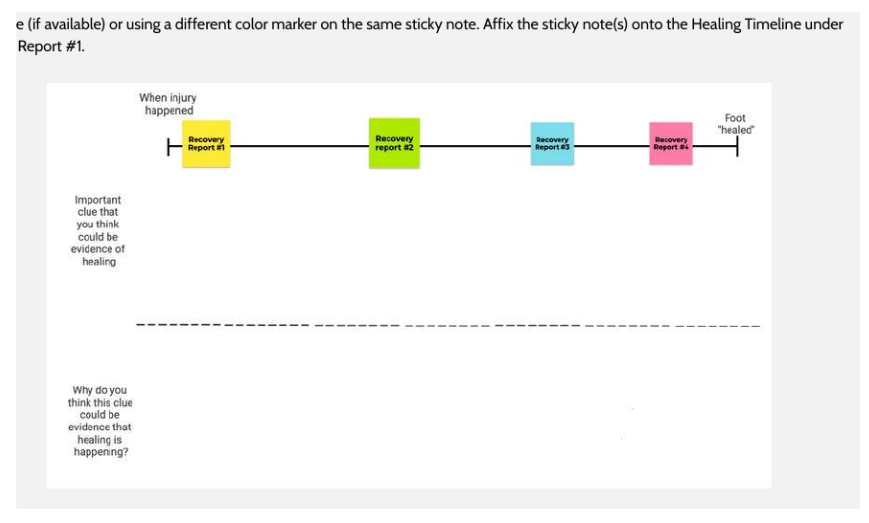
I add a simple annotated foot diagram for students to record notes about systems, subsystems, structures, and functions as they investigate.
- Foot as the larger system.
- Bone, muscle, and skin as major structures/subsystems.
- Blood and nerves as possible participants.
- Structure/function as the recurring lens.
Direct instruction here gives students a useful organizational frame they can return to throughout the lesson.
Modification #5: Replace some open-ended production with an evidence-and-reasoning card sort
Students match aspects of healing—events, structures, or transitions—with explanations for why each piece of evidence matters. This is intentionally more structured than open generation so students learn what counts as evidence and what reasoning sounds like.
Evidence is not automatically an explanation. “The cast came off” is an observation requiring reasoning about increased load or less external support.
What I am not trying to destroy: uncertainty
The original consensus-model routine preserves unresolved ideas about what fills the gaps, where new material comes from, how parts interact, and whether blood and nerves are involved. Students must leave Lesson 1 aware of those gaps.
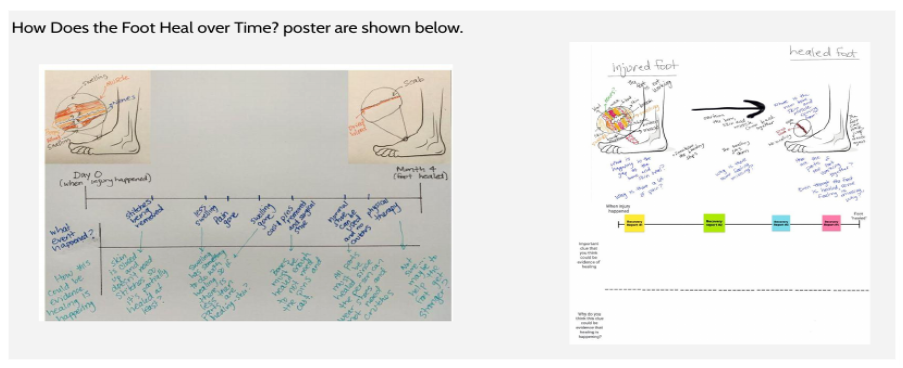
If the lesson feels more certain than the evidence allows, the launch has been over-taught.
Modification #6: Keep the DQB. Lose some of the ceremony.
The Driving Question Board is essential. The thirty-minute ritual is not. Preserve the board; reduce the ceremony.
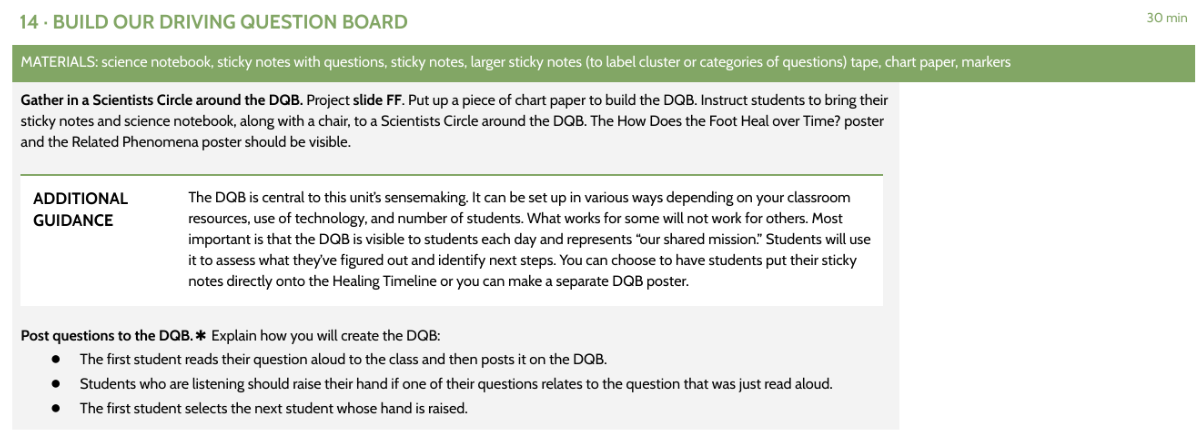
My expedited version uses a Google Form: students submit one or two questions, then tag which part of the case triggered the question. Questions can be projected, merged, discussed, and used to build a physical display without spending half a period on logistics.
A more visual phenomenon wall
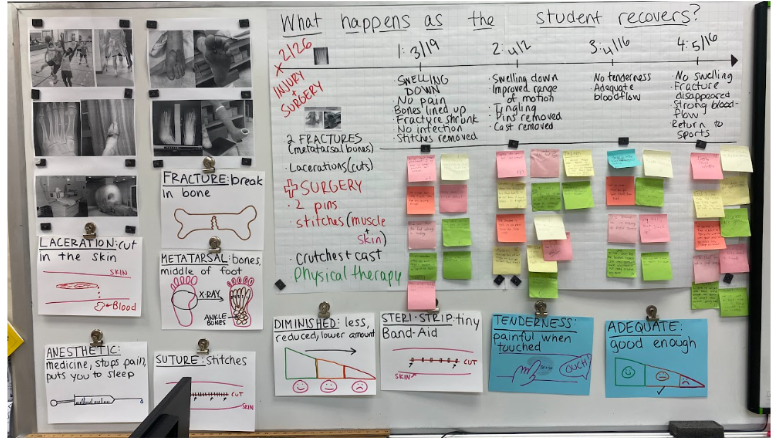
A real, visual wall keeps the class oriented. After an A/B-day gap, students can re-enter the storyline quickly and get back to evidence and reasoning.
Modification #7: Make the launch a real pre-assessment
Google Forms can collect related phenomena and questions in one place so I can compare across classes and revisit patterns. AI can then help me quickly summarize recurring ideas, misconceptions, vocabulary, and question clusters so I can make better day-two decisions.
The DQB tells me what students are curious about. The diagnostic tells me what they think they already know. I want both.
OpenSciEd vs. my rebuilt Lesson 1
| Element | OpenSciEd route | My current route |
|---|---|---|
| First exposure | Story + reports + notice/wonder | Visual case first; predict and hypothesize before reading. |
| ER / post-op reports | Separate report annotation and share-outs. | Guided annotation; possibly combine into one concise case packet. |
| Recovery reports | Notice/wonder, then identify evidence. | Symbol annotation followed by class reasoning. |
| Healing timeline | Students help construct timeline from evidence. | Provide chronology; students explain why each event is evidence. |
| Systems thinking | Developed through initial and consensus models. | Add a foot diagram for structured notes. |
| Evidence & reasoning | Generated through discussion and timeline. | Add a matching/card-sort rehearsal. |
| Initial model | Individual + comparison + consensus model. | Preserve initial thinking and uncertainty; streamline consensus protocol. |
| DQB | Sticky notes + Scientists Circle clustering. | 1–2 questions each in Google Form; discuss representative clusters. |
| Pre-assessment | Initial model functions as formative pre-assessment. | Add broader diagnostic Google Form + synthesis of class patterns. |
| Time | Four days. | Target: 1.5–2 days. |
The version I want to teach this year
Give Lesson 1 two deliberate days. If the class is moving quickly, use the back half of Day 2 to begin the medical-imagery work. If the launch is rich and students are asking useful questions, let the anchor breathe.
- Visual case file: see-think-wonder, prediction, and hypothesis.
- Guided injury report.
- Recovery reports with symbol annotation.
- Pre-built healing timeline.
- Exit: What changed? What still needs an explanation?
- Foot diagram notes: system, subsystems, structures, functions.
- Evidence/reasoning card sort.
- Initial model or concise before/after explanation.
- Expedited DQB in Google Forms.
- Diagnostic pre-assessment.
- Optional bridge into medical imagery.
What I am protecting, compressing, and still questioning
The bigger point
Curriculum modification is not choosing between fidelity and chaos. The original OpenSciEd lesson contains thoughtful moves worth preserving. Students can still reason scientifically when given a timeline, direct instruction on systems, a structured card sort, and digital DQB questions. This is adaptation as tradeoffs, not shortcuts.
The anchor story is still the same: a foot was badly injured, treated, and healed enough to walk again. The medical evidence is still our doorway. But now that doorway opens into a clearer path for students: first experience, then explanation.
We reduced the noise. We protected the key structures that make scientific sensemaking possible. And we built in space for student thinking at the right moments.
This is not the final form of the lesson. It is a first reliable version—one that teachers can try, observe, and improve.
Sources & design notes
Primary curriculum source: OpenSciEd Unit 6.6 Lesson 1 Teacher Edition (2/9/22). Core phenomena, student figures, recovery reports, and guidance are from the original lesson.
Instructional research lens: Guided-instruction principles inform the use of modeling, sequencing, scaffolds, and deliberate cognitive load.
Author’s note: Several ideas remain active design questions and will be refined through classroom trial and student work analysis.
Return to top ↑Unit 6.6 • Injuries & Healing
Launch the mystery: How did the injured foot heal enough to function again?
visual phenomenon • evidence of healing • systems thinking • timeline • student questions / DQB
- START VISUAL
Show injury/recovery photos + X-rays first. Students See–Think–Wonder, predict what happened, and cite evidence. - ER + POST-OP
Use guided annotation/direct instruction. Model how to read medical evidence rather than expecting independent decoding. - RECOVERY REPORTS
Annotate +, =, ×, ?, and ★. Discuss disagreements openly. - FOOT DIAGRAM
Briefly introduce system, subsystem, structure, and function. - HEALING TIMELINE
Give a mostly completed timeline. Students explain why each change is evidence of healing. - EVIDENCE → REASONING
Quick card sort matching evidence with an explanation of why the evidence matters. - DQB
Keep it, but streamline it. Students submit 1–2 questions digitally and categorize them. - PRE-ASSESSMENT
Short Google Form: knowledge + conceptual + application questions.
Two 66-minute periods already require meaningful compression; forcing the launch into one block risks turning inquiry into a rushed checklist.
Do not try to preserve every OpenSciEd routine. Preserve the mystery, the evidence, and the unanswered questions.
Lesson 1: Practical Application Guide
What this lesson really needs to accomplish
The purpose of Lesson 1 is to establish the mystery that will drive the unit. Students need to leave with a strong sense that something happened, that recovery took time, and that we still do not have the full explanation.
- More than one structure in the foot was injured.
- Bone, muscle, skin, blood, nerves, swelling, and movement may be relevant.
- Different parts did not recover all at once.
- There is evidence that the foot changed over time.
- Students have ideas but still cannot explain everything.
- The unanswered questions give the rest of the unit purpose.
That is the target. Everything in this lesson should simply be a way of getting students there.
What I have done in the past
1. Use the medical reports as both inquiry and instruction. I use the ER and Post-Surgical Reports as an early opportunity to teach students how to look carefully at scientific and medical evidence.
2. Give the Recovery Reports a simple annotation code. A low-risk symbol system lets students interpret evidence without assuming every detail has one obvious answer.
| Symbol | Meaning |
|---|---|
| + | Good / evidence of improvement |
| = | No change / about the same |
| × | Bad / evidence the foot is still injured |
| ? | I am not sure what this means |
| ★ | I predicted this |
3. Explicitly teach systems, subsystems, structure, and function.
- System: a set of parts that work together to do a big job. Example: the foot.
- Subsystems: smaller groups of parts within a system. Example: bones, muscles, blood vessels, skin.
- Structure: a physical part of the system.
- Function: what that structure does in the system.
4. Give students the timeline instead of making them construct it from scratch.
A pre-built timeline lets students focus on sensemaking, not sequencing. As they move through reports, stop at key points and ask: What happened at this time? Why is this evidence of healing? What does this make you wonder about?
5. Add an Evidence–Reasoning card sort.
Evidence — The fracture line becomes harder to see on the X-ray.
Reasoning — The gap between the broken portions of bone appears to be filling in or reconnecting.
6. Expedite the Driving Question Board without eliminating it.
Seeds of questions should be captured quickly during the lesson. Post and group them, but do not let this take more than a few minutes. Students will add to and revise the board throughout the unit.
7. Use the lesson as a genuine diagnostic assessment.
Listen for student ideas about structures, time, evidence, and healing. Note misconceptions and use this information to plan the next lessons.
8. Gather student thinking digitally — and use AI to make the data manageable.
Have students submit questions, predictions, timeline notes, and DQB ideas digitally. Use AI tools to summarize patterns, surface common questions and misconceptions, and help plan targeted instruction.
What I am considering this year
Start with the images
The first exposure should be overwhelmingly visual. I want students to meet the injury before they meet the language. Injury photos, X-rays, cast, crutches, and early recovery images create the emotional and intellectual entry point. The goal is not to explain; it is to surface prior ideas and predictions.
see → predict → read → confirm/revise → wonder again.
Turn predictions into something students can revisit
When students later read the Recovery Reports, they can mark ★ beside information they predicted and identify something they predicted correctly, something they missed, something that surprised them, and something they still cannot explain.
What I am still trying to solve
Do I really need two separate opening reports?
I want students to possess the information in the ER and Post-Surgical reports, but I am not convinced both documents deserve separate full-class treatment. One possibility is a concise before-and-after-surgery comparison that preserves the crucial evidence while reducing duplicate reading.
I do one with them before asking them to do more on their own. Guided injury report first; greater student independence with the Recovery Reports.
My current recommendation: give Lesson 1 two days
Images first, then first reports, then focused questions, initial DQB, and a snapshot of the timeline.
Build the timeline, do scaffolded sorts, share/compare ideas, and update questions and DQB.
Do not try to preserve every OpenSciEd routine. Preserve the mystery, the evidence, and the unanswered questions.