Blood — The Lesson I Haven't Solved Yet
- The dependable baseline lesson
- Reciprocal Teaching: Predict–Question–Clarify–Summarize
- Why microscope work moved to a separate lesson
- Bag of Blood, component stations, circulation stations, and other candidates
- Why one Carolina kit may be more useful than buying a class set immediately
- A two-year pilot, revision, and scaling cycle
I do not have a dramatic before-and-after story for Lesson 4.
Most years, I teach the blood content through a reading. It works. Students learn that blood is a mixture, that it contains red blood cells, white blood cells, platelets, and plasma, and that those components have different jobs. We connect structure to function. We move on.
The problem is not that the lesson fails.
The problem is that blood is too important to the rest of the unit for me to stop asking whether I can make the learning more concrete.
The Baseline Is Stronger Than It Looks
OpenSciEd's full Lesson 4 is ambitious. It spans three days: one largely devoted to microscope orientation and scale, one to microscopic observations of human and mammal blood, and one to reading and discussion about blood components and their functions. The lesson is designed so students first notice that blood is a mixture, then see microscopic structures, and finally use text to name those components and connect structure to function.
The intellectual sequence is legitimate. But I no longer need the blood lesson to carry the full burden of teaching microscope use. I have separated that work into a dedicated microscope lesson, where students can learn the tool, sketch what they see, and work with a blood smear without asking the blood-content lesson to do two jobs at once.
Students should leave knowing that blood is a flowy mixture made of red blood cells, white blood cells, platelets, and plasma; that those components have different functions; that their structures support those functions; and that blood vessels provide a pathway that lets blood move materials throughout the body.
What OpenSciEd Is Trying to Build
The official lesson moves deliberately across scales. Students begin with the whole-body distribution of blood vessels and the visible separation of a blood sample into layers. They then use microscopes to reveal components that cannot be seen with the unaided eye. Finally, they read to identify the components and connect their structures with their functions.
That progression matters. The reading is not supposed to be an isolated information dump; it is meant to explain patterns students have already observed.
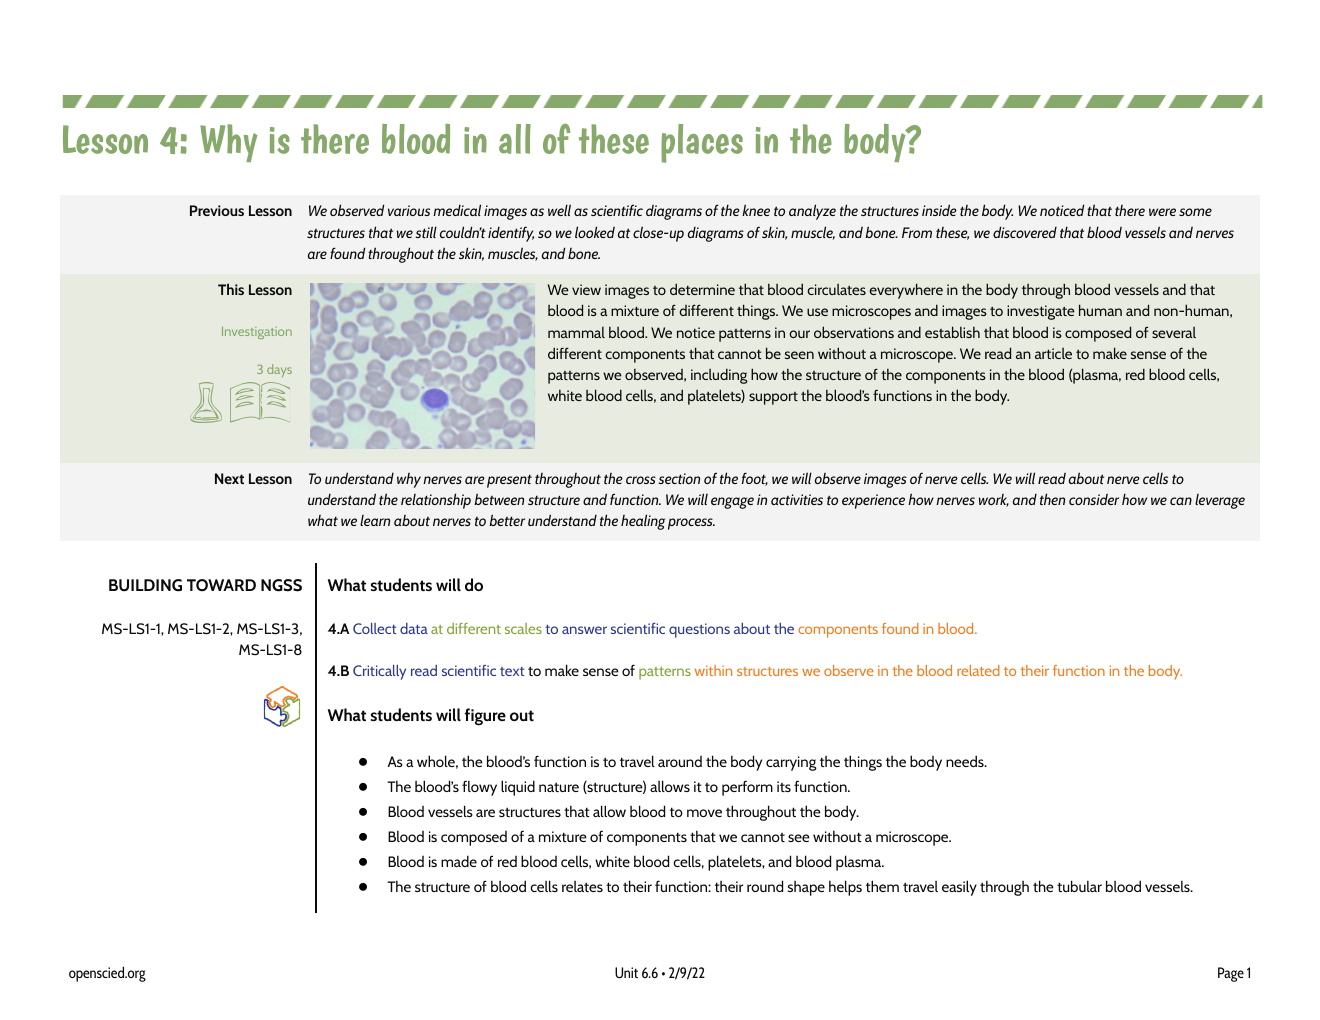
When I strip the lesson down to its intellectual architecture, I see a sequence worth protecting:
1) Evidence that blood is found throughout the body. 2) A clear representation of the four major blood components. 3) Structure/function thinking for those components. 4) A connection back to the injured foot: why would damaged tissue need access to blood?
What I Have Done: Mostly Make the Reading Work Better
I have not historically rebuilt this lesson around a big lab. Most of the time I focus on the blood reading and use the lesson as an opportunity to teach students how to read difficult informational text.
That is less glamorous than a circulating-fluid model or a room-sized simulation, but it is dependable. The blood content is compact enough that a good reading strategy can get students where they need to go without pretending that every important idea has to become a laboratory.
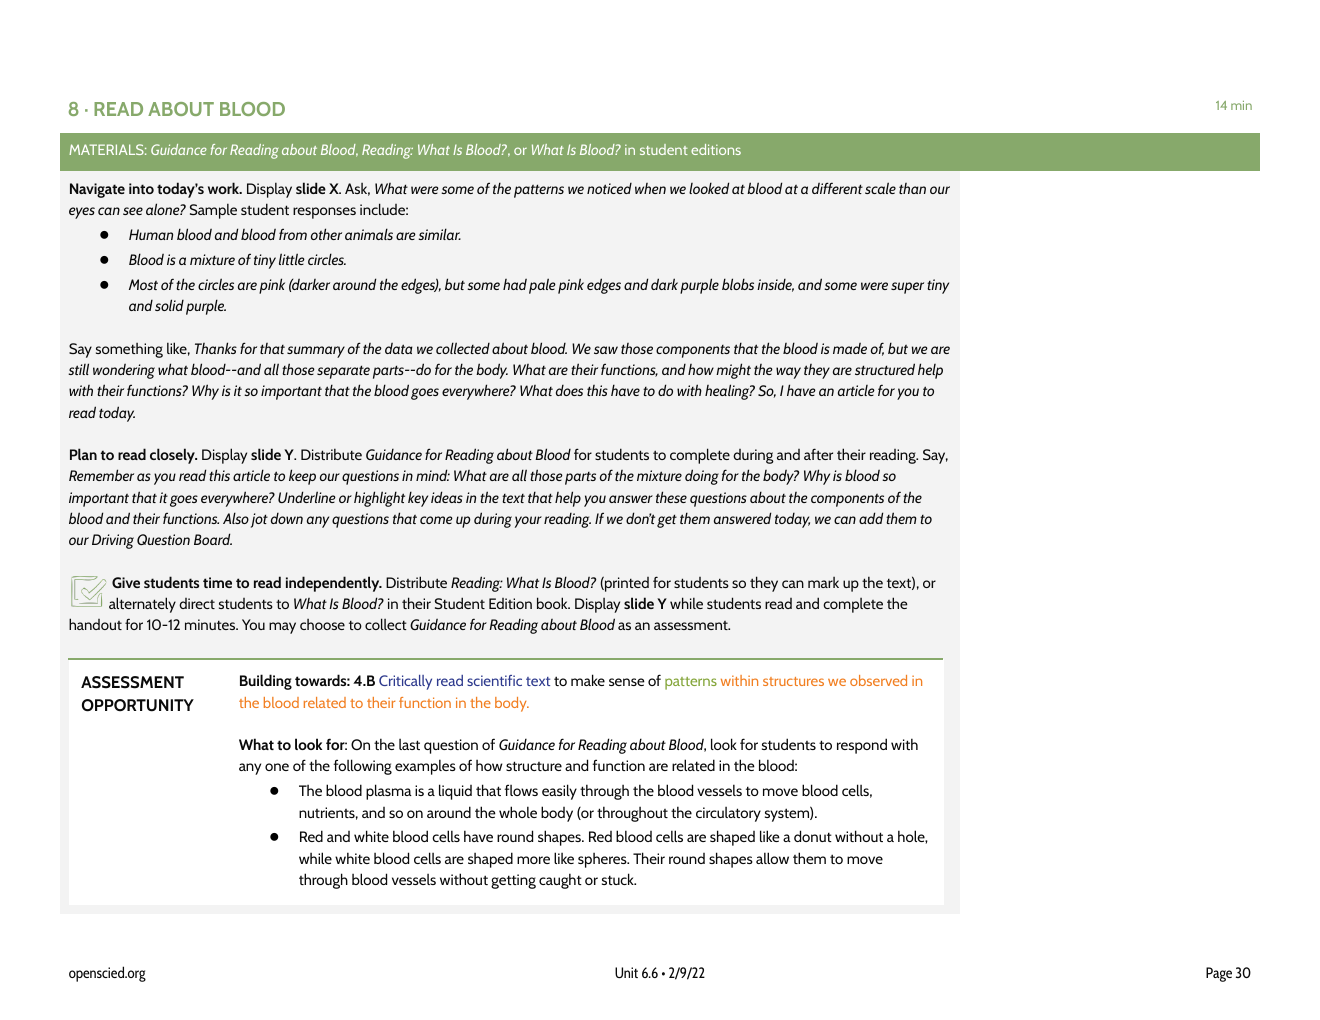
Modification #1: Use Reciprocal Teaching Instead of a Worksheet
My preferred reading routine is Reciprocal Teaching. Students divide a notebook page into four squares: Predict, Question, Clarify, and Summarize.
I read a manageable section aloud first. Students then reread it themselves, annotate the text, and add ideas to the four-square. We repeat that cycle with the next section. The goal is not to fill four boxes for the sake of filling boxes. The goal is to make the invisible work of comprehension visible.
What Reciprocal Teaching Is Actually Doing
The original Reciprocal Teaching model uses four comprehension moves—predicting, questioning, clarifying, and summarizing—inside teacher-student dialogue. The teacher initially models the moves and then gradually shifts more of the responsibility to students.
That matters because the routine is not simply a four-box graphic organizer. The power is in repeatedly asking students to anticipate meaning, notice confusion, repair that confusion, and compress what they learned into a useful summary.
| Move | What students do | Why it matters |
|---|---|---|
| Predict | Use headings, images, prior knowledge, and the previous section to anticipate what comes next. | Activates background knowledge and gives students a purpose for reading. |
| Question | Generate a question the section answers—or a question the section creates. | Makes students monitor meaning instead of simply moving their eyes across the page. |
| Clarify | Identify a confusing word, sentence, diagram, or idea and work out what it means. | Normalizes confusion as part of reading and teaches students to repair comprehension. |
| Summarize | State the most important idea in their own words. | Forces students to decide what matters and creates a study-ready record. |
How I Use the Four-Square With the Blood Reading
I do not hand students the whole article and say, “Fill this out.” I chunk the text. I model one section. We annotate together. Then students reread and add to the four-square. As the lesson continues, I do less of the thinking aloud and students do more.
A successful product is a well-annotated blood text plus a four-square containing useful predictions, real questions, clarified vocabulary/ideas, and concise summaries—not four boxes packed with filler.
The Reading Does Not Have to Be the Lesson Forever
Even if I eventually replace the reading as the central class activity, I would still give students the text.
It can become an at-home reference for the unit study guide, a makeup resource, a study-hall task, a filler activity when students finish early, or simply a second explanation for a student who needs one more pass at the content.
That changes the question from “Do I keep the reading or replace it?” to something more useful:
A resource does not have to be the central learning experience in order to remain valuable.
Modification #2: Move the Microscope Work to a Microscope Lesson
I do still use blood under the microscope. Students observe the smear and make scientific sketches. I just no longer need that work to live inside Lesson 4.
Putting microscope orientation, focusing, magnification, field of view, and scientific sketching into a separate microscope lesson lets the blood lesson focus on blood. Then the microscopic image becomes evidence students already know how to collect rather than the excuse for an entire tool-training day.
Old structure: learn the microscope → practice → observe blood → read about blood.
My current structure: learn microscopes in a dedicated lesson; let Lesson 4 focus on what blood is, what its components do, and why injured tissue needs it.
The Activity I Am Still Trying to Find
This is where Lesson 4 becomes a design chapter rather than a finished lesson.
The reading works. That means a replacement has to earn its place. “Hands-on” is not enough. A new activity has to make the structure of blood, the functions of its components, or the importance of circulation easier to understand than the dependable reading does.
I am especially interested in activities that let students manipulate a model, make a prediction, change a condition, and then explain what happened.
Can students use the model to explain something they could not explain as clearly before? If not, the activity may be engaging, but it has not yet earned instructional time.
Candidate #1: Make a Bag of Blood
This may be the cleanest direct replacement for the reading-centered blood-composition lesson. Each group builds a physical model of blood: a liquid portion representing plasma, many red pieces for red blood cells, a smaller number of larger white pieces for white blood cells, and tiny pieces representing platelets.
| Blood component | Possible model | Question the model must answer |
|---|---|---|
| Plasma | Yellow-tinted water | Why does blood need a liquid portion? |
| Red blood cells | Red beads / pom-poms | Why are there so many, and what are they transporting? |
| White blood cells | Larger white beads | Why are there fewer, and when do they matter? |
| Platelets | Tiny beads / confetti / sticky pieces | Why would tiny sticky pieces help when a vessel is damaged? |
The important move comes after building it. Students apply the model to scenarios: a cut, a fracture, an infection, exercise, dehydration, or a blockage. Now the bag is not a craft. It is something students have to use to explain a changing biological situation.
Candidate #2: Turn the Bloodstream Into Stations
A second possibility is to make the classroom itself a circulation model. Stations represent locations where materials are exchanged or problems arise.
At the lungs, red blood cells trade carbon dioxide for oxygen. At body tissues, they deliver oxygen and pick up carbon dioxide. Plasma can carry nutrients from an intestine station and wastes away from tissues. Platelets can respond to a cut or laceration station. White blood cells can respond to an infection station.
I could also give students roles and have them physically circulate around the room. That would shift the content from “what are the parts of blood?” toward a more dynamic question: “What does blood accomplish by moving everywhere?”
Teacher-ready resourceDownload the complete 22-page Bloodstream Role-Play with role cards, six station signs, printable tokens, student capture sheets, and debrief guidance.
Download the Role-Play PDFCandidate #3: “Who Saved the Broken Foot?”
Another version would keep the unit phenomenon even tighter. Four short stations could each represent one blood component. Every task would end with the same question: How could this component matter near the broken metatarsals?
- RBC station: move oxygen tokens through a constrained pathway to injured tissue.
- Plasma station: model a fluid medium carrying dissolved materials.
- Platelet station: patch or plug a simulated vessel leak.
- WBC station: respond to a simulated infection or foreign material.
That keeps the blood lesson from becoming a generic human-body detour. The injured foot remains the reason to care.
Candidate #4: Use the Carolina Kit—but Do Not Force It Into the Wrong Job
The Carolina circulatory-system kit is appealing because it gives students real tubing, pumps, and one-way valves. That makes it promising for modeling flow, closed loops, direction, blockage, and the relationship among vessels and a pump.
But that is a different instructional problem from teaching the composition of blood. The kit is better suited to the question “How does blood get everywhere?” than “What is blood made of?”
That distinction matters. A good piece of equipment can still be the wrong tool for the learning target.
Use one Carolina kit with the resource class, where there is time to slow down, test the directions, see what misconceptions appear, and discover whether the model is worth scaling. If the activity earns its place, order more later.
Candidate #5: Build the Circulation Model Into the Classroom Skeleton
I am also intrigued by a whole-class model rather than a full set of kits. The classroom skeleton could become the frame for tubing or visible pathways that represent vessels. A pump and one-way valves could make flow visible without requiring a major purchase.
That kind of model would not replace individual student reasoning, but it could become a durable reference for later discussions about injury, circulation, nerves, cells, and transport.
The question is whether I can build something simple enough to use repeatedly instead of a clever demonstration that takes hours to construct and five minutes to understand.
OpenSciEd vs. My Rebuilt Lesson 4
| Element | OpenSciEd route | My current / emerging route |
|---|---|---|
| Time | Three days | One focused blood-content lesson, with microscope work moved elsewhere; future hands-on extension still being tested. |
| Microscope training | Large portion of Day 1 is devoted to discovering microscope use and scale. | Teach microscope skills in a separate microscope lesson. |
| Blood observation | Human slide + animal images at several magnifications. | Keep the blood smear/sketching in the microscope lesson; reuse images as evidence if helpful. |
| Reading | Core Day 3 sense-making activity. | Still valuable; use Reciprocal Teaching or keep as reference / study-hall / makeup resource. |
| Blood components | Names and functions emerge after microscope observations and reading. | Teach the four components efficiently, then spend reclaimed time applying the ideas. |
| Structure/function | Reading + discussion | Protect strongly; whichever activity replaces the reading must make this relationship visible. |
| Hands-on component model | Not central to published lesson. | Bag of Blood or four-component stations are leading candidates. |
| Circulation model | Whole-body vessel image and discussion. | Possible role-play stations, Carolina kit pilot, or whole-class skeleton/tubing model. |
| Healing connection | Students begin connecting blood back to injury. | Make the broken foot a repeated application question rather than a brief end-of-lesson connection. |
| Development status | Published sequence is complete. | Established reading routine + separate microscope lesson; hands-on replacement is intentionally still in R&D. |
What I Am Protecting, Compressing, and Still Questioning
The Version I Want to Try This Year
I do not need the final two-year version this September. I need a useful pilot.
A Two-Year Development Cycle
| When | What I do | What I am trying to learn |
|---|---|---|
| This year — small pilot | Try one new activity with one or two classes; use the resource class for the Carolina kit if appropriate. | Do students actually reason with the model? Where does it confuse them? What materials fail? How long does it really take? |
| This year — revise | Keep notes, photos of setup, student products, and a short post-lesson reflection. | What should be cut, directly taught, reordered, or added before scaling? |
| Next summer | Choose the strongest model and build clean directions/materials. | Can another teacher understand and run the activity without needing the version that exists only in my head? |
| Next year | Scale the activity across classes if it has earned the investment. | Does the rebuilt version outperform the dependable reading strongly enough to become the new default? |
The Bigger Point
Lesson 4 may end up being one of the most useful chapters in this project precisely because I have not solved it.
Curriculum revision is often written backward. We show the polished lesson after the failed versions have disappeared. That can make improvement look like inspiration: teacher sees problem, teacher invents brilliant replacement, students love it, end of story.
That is not how this one looks.
I have a dependable reading lesson. I have a reading routine I trust. I have moved microscope work somewhere it makes more curricular sense. Now I have several possible hands-on replacements, none of which I am ready to call the answer.
So the professional work is selection: What is the actual learning target? What does the current lesson already do well? Which weakness am I trying to solve? What is the cheapest version of a new idea that I can test? What evidence will tell me whether it worked? What can wait until next year?
Blood Components, Structure, Function, and Healing
The goal: Figure out what blood is made of, what each component does, and why a flowy mixture moving through vessels is useful throughout the body.
Protect: blood as mixture • RBCs / WBCs / platelets / plasma • structure → function • vessels as pathways • transport • healing connection
- Hook with blood: Use the whole-body vessel image and/or separated blood tube to establish: blood is everywhere and blood is a mixture.
- Teach the components: Students need red blood cells, white blood cells, platelets, and plasma—plus one useful function for each.
- Use Reciprocal Teaching: Predict → Question → Clarify → Summarize. Chunk the reading; annotate; gradually release responsibility.
- Keep structure/function: Ask how liquid plasma, flexible rounded cells, and sticky/branching platelets support their jobs.
- Apply to the foot: For every component ask: Why could this matter near damaged tissue or a broken metatarsal?
- Keep microscopes separate: Use the blood smear and sketching in the dedicated microscope lesson rather than spending this lesson on tool training.
- Pilot one hands-on model: Best first candidates: Bag of Blood or simplified component stations. Do not try every idea at once.
- Keep the text anyway: Even if the hands-on model wins, the reading can remain a study-guide reference, makeup task, study-hall task, or fallback.
Default • One 66-min period: Blood hook → Reciprocal Teaching / concise notes → structure-function → broken-foot application.
Pilot • One 66-min period: Blood hook → short direct setup → Bag of Blood or stations → application scenarios → text kept as reference.
Do not replace a dependable reading with a hands-on activity just because it is hands-on. Pilot the activity until it explains the science better than the thing it is replacing.
What This Lesson Really Needs to Accomplish
Do not let microscope procedures or a new activity become the lesson. Students need a clear, durable model of what blood is and what its major components do.
Blood is a flowy mixture made of plasma, red blood cells, white blood cells, and platelets. Blood vessels provide pathways that let the mixture move throughout the body. The structures of the components help them perform their functions.
- Blood vessels are found throughout the body.
- Blood is a mixture, not one uniform substance.
- Red blood cells carry oxygen.
- White blood cells help respond to disease/infection.
- Platelets help plug damaged vessels and reduce leaking.
- Plasma is the liquid medium that carries cells and dissolved materials.
- Structure supports function.
- These ideas should connect back to why injured tissue needs access to blood.
What I Have Done in the Past
1. Use the reading as the reliable baseline. The reading lesson works. It is a dependable way to teach the content when time or materials make experimentation impractical.
2. Use Reciprocal Teaching. Students create a Predict / Question / Clarify / Summarize four-square. I chunk the reading, model the routine, have students reread and annotate, and gradually shift more of the work to them.
3. Move the microscope investigation elsewhere. Blood-smear observation and scientific sketching still happen, but in a separate microscope lesson where the instructional target is using the tool and recording microscopic evidence.
What I Am Considering Now
1. Bag of Blood. Best candidate for composition. Students physically build a model of the four major blood components and then use it to explain injury, infection, exercise, dehydration, or blockage scenarios.
2. Component stations. Four short tasks—RBC, plasma, platelets, WBC—can keep the focus on what each component contributes and why it could matter near the injured foot.
3. Circulation / body-location stations. Students circulate through lungs, intestines/body tissues, infection, and injury stations exchanging tokens. Best for transport and circulation rather than blood composition.
4. Carolina circulatory-system kit. Use primarily to model pumps, tubing, one-way flow, closed loops, blockage, and vessel networks. Pilot with a small class before buying enough to scale.
5. Whole-class skeleton model. Potential low-cost visual model for tubing and circulation pathways. Worth pursuing only if it becomes a reusable thinking tool rather than a one-time prop.
My Current Recommendation
For this year, keep the Reciprocal Teaching reading as the safety net and pilot one hands-on model. Give students the text regardless. If the pilot works, revise it. If it does not, the unit still has a dependable lesson.
Change one major variable at a time. If I try Bag of Blood, circulation stations, a Carolina build, and a new reading routine simultaneously, I will have no idea which part improved—or damaged—the lesson.
What to Cut First
- The full day of open-ended microscope orientation.
- Millimeter graph-paper measurement at every objective.
- Extended refraction/lens discussion.
- Multiple human/animal observation tables.
- Repeated partner and Scientists Circle share-outs.
- Detailed stain-color discussion.
- Long Progress Tracker and DQB updates.
- Optional ratios/percentages extension.
What Not to Cut
- Blood is found throughout the body.
- Blood is a mixture.
- RBCs, WBCs, platelets, and plasma.
- A useful function for each component.
- Structure-function relationships.
- Blood vessels as transport pathways.
- Connection to the injured foot and healing.
Sources & Design Notes
Primary curriculum source. OpenSciEd. Unit 6.6, Lesson 4 Teacher Edition, “Why is there blood in all of these places in the body?” Version dated 2/9/22. Curriculum screenshots in this chapter are excerpted from the Teacher Edition for commentary, comparison, and instructional analysis.
The published lesson is a three-day investigation involving microscope orientation, microscopic blood observations, reading, structure/function sense-making, systems thinking, and a transition to nerves.
Reciprocal Teaching. Palincsar, A. S., & Brown, A. L. (1984). Reciprocal Teaching of Comprehension-Fostering and Comprehension-Monitoring Activities. Cognition and Instruction, 1(2), 117–175. The framework emphasizes predicting, questioning, clarifying, and summarizing in dialogue with gradual transfer of responsibility.
Author's note. Established practice: reciprocal-teaching reading routine, distributing the blood text as a student resource, and moving microscope skills and blood sketching into a separate microscope lesson. Active experiments: Bag of Blood, simplified component stations, body-location circulation stations, using one Carolina kit with a small class, and a possible whole-class circulation model built around the classroom skeleton.